
Note: This guide reflects our early-stage configuration for pilot users. The process and required permissions may evolve as we continue to develop our system.
Prerequisites
Before proceeding, ensure you have:
- Microsoft 365 with Exchange Online.
- Global Administrator or Exchange Administrator access to your Microsoft 365 tenant.
Configuring email read and write access
Our system uses Security Groups and Role-Based Access Control (RBAC) for applications to ensure that permissions are granted securely and only to the necessary resources.
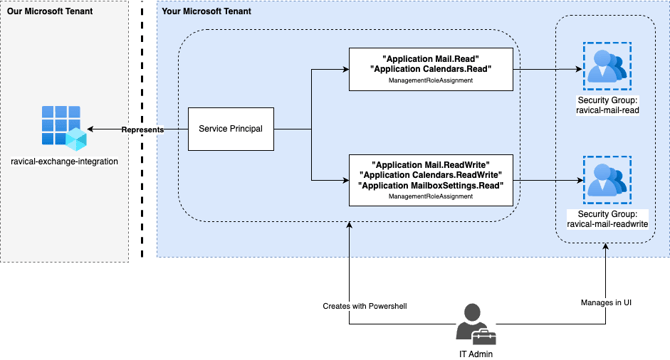
Step 1: Grant Consent to the Enterprise Application
We have pre-registered an enterprise application for integration with your Microsoft 365 environment. Follow the steps below to grant consent:
- Navigate to the following url:
You will be redirected to a Microsoft consent page.https://login.microsoftonline.com/organizations/adminconsent?client_id=20b1159d-471c-4c7e-9fda-a78fb0abae7b&redirect_uri=https://api.prod.ravical.com/api/v1/microsoft/auth/callback - Review the permissions requested by our application.
- Click Accept to grant admin consent.
Once the admin has given consent, our system will be authorized to make API calls to your Microsoft 365 tenant using your Tenant ID.
Step 2: Automated Resource Setup via PowerShell
For your convenience we have created a PowerShell script that automates the creation of all necessary resources and assignments for Exchange Online integration.
The script will:
- Create two Security Groups:
-
- ravical-mail-read
-
- ravical-mail-readwrite
- Create a Service Principal linked to our Exchange Online syncing application.
- Assign scoped permissions:
-
- Mail.Read & Calendars.Read for members of the ReadOnly group.
-
- Mail.ReadWrite, Calendars.ReadWrite & MailboxSettings.Read for members of the ReadWrite group.
Follow the steps below to execute the PowerShell script:
- Install required modules:
Install-Module Microsoft.Graph -Scope CurrentUser -Force -AllowClobber

Install-Module -Name ExchangeOnlineManagement
Troubleshooting Tip: If you have the ExchangeOnlineManagement module already installed but encounter issues, it’s possible that an outdated version is causing problems. Run the following command to remove all versions before reinstalling:
Uninstall-Module -Name ExchangeOnlineManagement -AllVersions -Force
Install-Module -Name ExchangeOnlineManagement - Download the .ps1 file from here or create a .ps1 file and paste in the full script provided:
$RavicalAppDisplayName = "Ravical Exchange Integration" # Display name of the Ravical app. Feel free to change this if you want a different name.
$RavicalScopedAppClientId = "20b1159d-471c-4c7e-9fda-a78fb0abae7b" # Application ID of the Ravical app. Do not change this.
$RavicalReadWriteSecurityGroupName = "ravical-mail-readwrite" # Name of the security group that will be created for read/write access to Exchange Online mailboxes. Feel free to change this if you want a different name.
$RavicalReadOnlySecurityGroupName = "ravical-mail-read" # Name of the security group that will be created for read-only access to Exchange Online mailboxes. Feel free to change this if you want a different name.

<#
  This is the main function of the installation flow, it will connect to Microsoft Graph and Exchange Online and create the following resources:
  - A Service principal for the Ravical Exchange app
  - Security group for read/write access to Exchange Online mailboxes
  - Security group for read-only access to Exchange Online mailboxes
  - Scoped role assignment for the Ravical app to the read/write group
  - Scoped role assignment for the Ravical app to the read-only group
#>
function InstallRavicalExchangeScopedAccessClient {
  ## Perform sanity checks to ensure everything is in place for the script to run.
  AssertModuleInstalled "Microsoft.Graph" "Install-Module Microsoft.Graph -Scope CurrentUser -Force"
  AssertModuleInstalled "ExchangeOnlineManagement" "Install-Module -Name ExchangeOnlineManagement"

  Write-Host "Connecting to Microsoft Graph for tenant. Please log in to your admin account in the desired tenant through the browser."
  Connect-MgGraph -Scopes "Group.ReadWrite.All", "Application.Read.All" -ContextScope Process -NoWelcome
  $TenantId = (Get-MgOrganization).Id
  Write-Host "Successfully connected to tenant $TenantId"
  $RavicalScopedAppObjectId = AssertServicePrincipalExistsAndGetObjectId $RavicalScopedAppClientId
  $readWriteGroup = CreateGroup -name $RavicalReadWriteSecurityGroupName -description "Read and write access to Exchange Online mailboxes for Ravical"
  $readOnlyGroup = CreateGroup -name $RavicalReadOnlySecurityGroupName -description "Read only access to Exchange Online mailboxes for Ravical"

  Write-Host "Connecting to Exchange Online for tenant $TenantId, please grant consent in the browser when prompted. Note that it may take a while for the connection to be established after consent is granted."
  Connect-ExchangeOnline -Organization $TenantId -ShowBanner:$false
  Write-Host "Successfully connected to Exchange Online for tenant $TenantId"

  NewServicePrincipal -appId $RavicalScopedAppClientId -appObjectId $RavicalScopedAppObjectId -displayName $RavicalAppDisplayName
  Write-Host "Creating role assignments for $RavicalAppDisplayName"
  ## https://learn.microsoft.com/en-us/exchange/permissions-exo/application-rbac#supported-application-roles
  CreateManagementRoleAssignment -role "Application Mail.Read" -appObjectId $RavicalScopedAppObjectId -groupId $readOnlyGroup.DisplayName -roleName "ravical:ro:mail.r:${RavicalScopedAppClientId}"
  CreateManagementRoleAssignment -role "Application Calendars.Read" -appObjectId $RavicalScopedAppObjectId -groupId $readOnlyGroup.DisplayName -roleName "ravical:ro:cal.r:${RavicalScopedAppClientId}"
  CreateManagementRoleAssignment -role "Application Mail.ReadWrite" -appObjectId $RavicalScopedAppObjectId -groupId $readWriteGroup.DisplayName -roleName "ravical:rw:mail.rw:${RavicalScopedAppClientId}"
  CreateManagementRoleAssignment -role "Application Calendars.ReadWrite" -appObjectId $RavicalScopedAppObjectId -groupId $readWriteGroup.DisplayName -roleName "ravical:rw:cal.rw:${RavicalScopedAppClientId}"
  CreateManagementRoleAssignment -role "Application MailboxSettings.Read" -appObjectId $RavicalScopedAppObjectId -groupId $readWriteGroup.DisplayName -roleName "ravical:rw:mailsettings.r:${RavicalScopedAppClientId}"
}


function CreateManagementRoleAssignment($role, $appObjectId, $groupId, $roleName) {
  $existingRoleAssignments = Get-ManagementRoleAssignment -Role $role -RoleAssignee $appObjectId
  if ($existingRoleAssignments.Count -gt 0) {
    foreach ($existingRoleAssignment in $existingRoleAssignments) {
      Write-Host "Role assignment $roleName already exists and is set to $($existingRoleAssignment.RecipientWriteScope):$($existingRoleAssignment.CustomResourceScope), updating."
      Set-ManagementRoleAssignment -Identity $existingRoleAssignment.Identity -RecipientGroupScope $groupId
      $updatedRoleAssignment = Get-ManagementRoleAssignment -Role $role -RoleAssignee $appObjectId
      Write-Host "Role assignment $roleName is now set to $($updatedRoleAssignment.RecipientWriteScope):$($updatedRoleAssignment.CustomResourceScope)"
    }
  } else {
    Write-Host "Role assignment $roleName does not exist, creating."
    $newRoleAssignment = New-ManagementRoleAssignment -Role $role -App $appObjectId -RecipientGroupScope $groupId -Name $roleName
    Write-Host "Role assignment $roleName is now set to $($newRoleAssignment.RecipientWriteScope):$($newRoleAssignment.CustomResourceScope)"
  }
}

function AssertModuleInstalled($moduleName, $instructions) {
  $module = Get-Module -ListAvailable -Name $moduleName
  if ($null -eq $module) {
    Write-Error "
    Module $moduleName is not installed, please install it first by running:
      $instructions
    "
    exit 1
  }
}

function AssertServicePrincipalExistsAndGetObjectId($appId) {
  $servicePrincipal = Get-MgServicePrincipal -All -Filter "AppId eq '$appId'"
  if ($servicePrincipal.Count -eq 0) {
    Write-Error "
    Service principal $appId does not exist, please visit the following URL to grant access:
    https://login.microsoftonline.com/$TenantId/adminconsent?client_id=$RavicalScopedAppClientId&redirect_uri=https://api.prod.ravical.com/api/v1/microsoft/auth/callback
    "
    exit 1
  }
  return $servicePrincipal.Id
}

function CreateGroup($name, $description, $visibility) {
  $existingGroups = Get-MgGroup -Filter "DisplayName eq '$name'"
  if ($existingGroups.Count -gt 0) {
    Write-Host "Group $($existingGroups.DisplayName) already exists, skipping creation."
    Write-Host "Group ID: $($existingGroups.Id) $($existingGroups)"
    return $existingGroups
  }

  Write-Host "Creating group $name"
  $group = New-MgGroup -DisplayName $name -SecurityEnabled:$True -MailEnabled:$False -Confirm:$true -Description $description -MailNickname $name
  Write-Host "Created group $name"
  return $group
}

function NewServicePrincipal($appId, $appObjectId, $displayName) {
  $existingServicePrincipals = Get-ServicePrincipal -Identity $appId -ErrorAction Ignore
  if ($existingServicePrincipals.Count -gt 0) {
    Write-Host "Service principal $displayName already exists"
    return $existingServicePrincipals
  }

  Write-Host "Creating service principal $displayName for app $appId"
  New-ServicePrincipal -AppId $appId -ObjectId $appObjectId -DisplayName $displayName
}

<# RUN THE INSTALLATION SCRIPT #>
InstallRavicalExchangeScopedAccessClient - Run the script from PowerShell. NOTE: It may take a few minutes for the Groups to be synced between Microsoft Entra and Exchange. So you may see
Group "ravical-mail-read" wasn't found. Please make sure you have typed the name correctlywhen running the powershell script for the first time. If this happens, wait a few minutes and run the script again.
Step 3: Assign Users to the Groups
After the script completes:
- Go to the Microsoft Entra Admin Center > Groups > All Groups.
- Select each of the Groups.
- Navigate to Members > Add members and assign users accordingly. You need to add every user as a direct member to these groups. Scoped access through nested groups is not supported by Exchange:
ravical-mail-read: most users (apply exclusions manually as needed) for which the app needs read accessravical-mail-readwrite: only designated testers for which the app needs read and write access
- Click Add to finalize.